iOS and TestFlight CI/CD using GitHub Actions & Self-Hosted Mac Mini Runner
Heck, I bought a Mac Mini just for this
Apple Silicon performs much better than Intel Macs when it comes to building iOS apps. And since I wasn’t able to afford a new MacBook Pro with Apple Silicon, I decided to get a used Mac Mini instead. And because I still want to use my MacBook Pro (2019, 16-inch with i9 processor which suffers from thermal throttling), I initially planned to use the Mac Mini as a (remote) CI/CD machine.
Prerequisites
This guide will assume that you already have the following setup:
- A GitHub Account
- A GitHub Repository
- With an iOS project that you can build
- A Mac that you can use as a runner (either Intel or Apple Silicon)
- With Xcode & Command Line Tools installed
- Keep in mind that this machine should be able to run 24/7 in ideal conditions. You never want to run into a situation where your CI/CD machine is “down”.
- For extra safety, you will want to create a separate user account just to run the CI/CD scripts. I will explain more on this later.
- An Apple Developer account
Configure the Mac Mini
Optional: Create a new user account
This is optional, but I recommend creating a new user account just for running the CI/CD scripts. This is to prevent any potential security issues that might arise from running the scripts as a root user. If you have any personal information on the machine, you will want to keep it safe. Using a self-hosted machine for CI/CD is basically the equivalent of allowing GitHub Actions to run arbitrary code on your machine. You will want to take extra precautions.
Create an account with a username of your choice. I will use runner as the username for this guide. Although you may run into some permission-related issues, I’d also strongly recommend disabling admin privileges for this account.
Setting up self-hosted runner
Now we will let GitHub know that we would like to use our Mac Mini as a self-hosted runner.
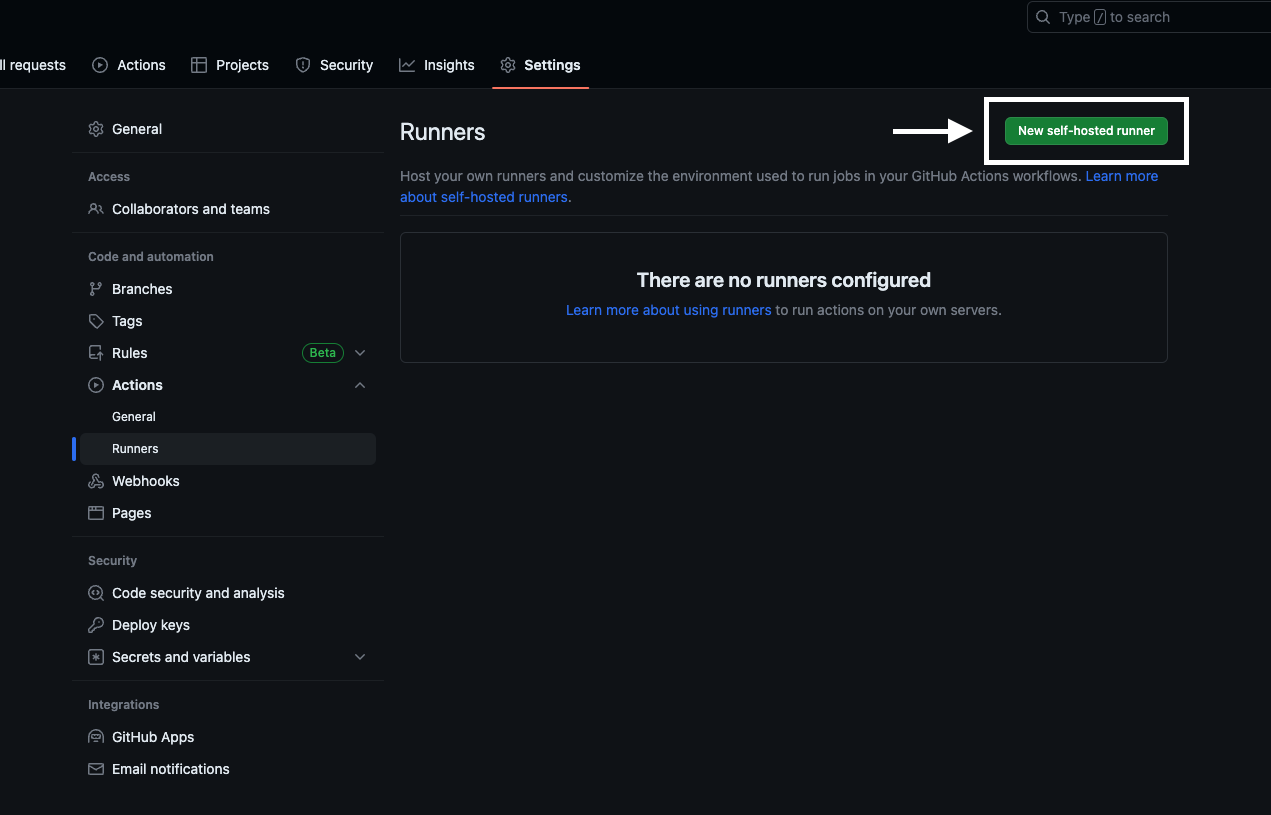
Head over to your repository’s settings page and click on “Actions” on the left sidebar. Then click on “New self-hosted runner” under “Runners”.
After clicking on “New self-hosted runner”, you will be presented with a list of options to choose from. Select “macOS” and your desired architecture (x64 for Intel or arm64 Apple Silicon).
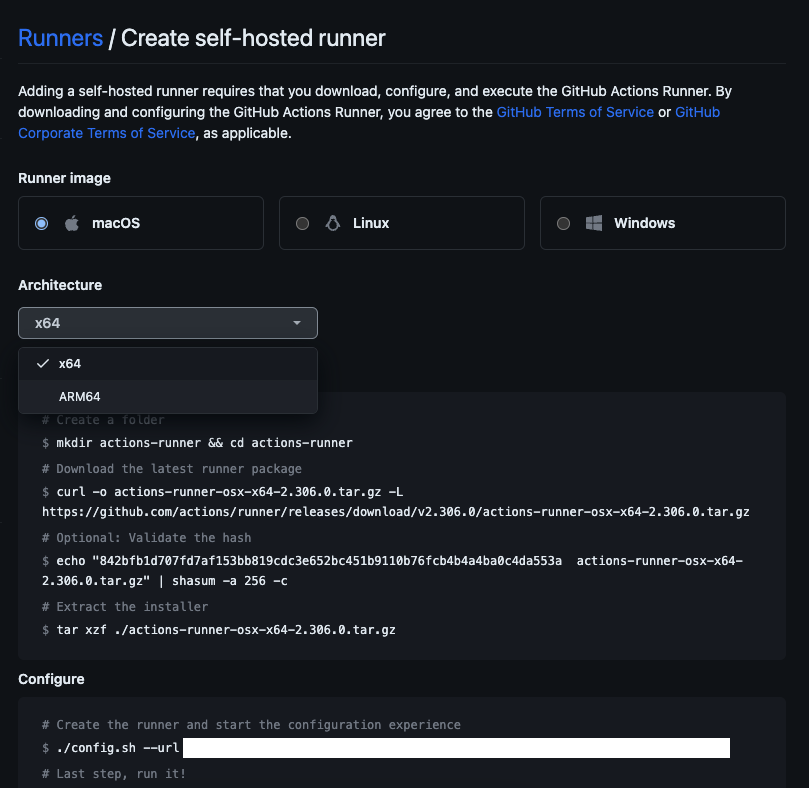
After selecting your desired architecture, you will be presented with a list of commands. Copy the commands and run them on the Runner Machine.
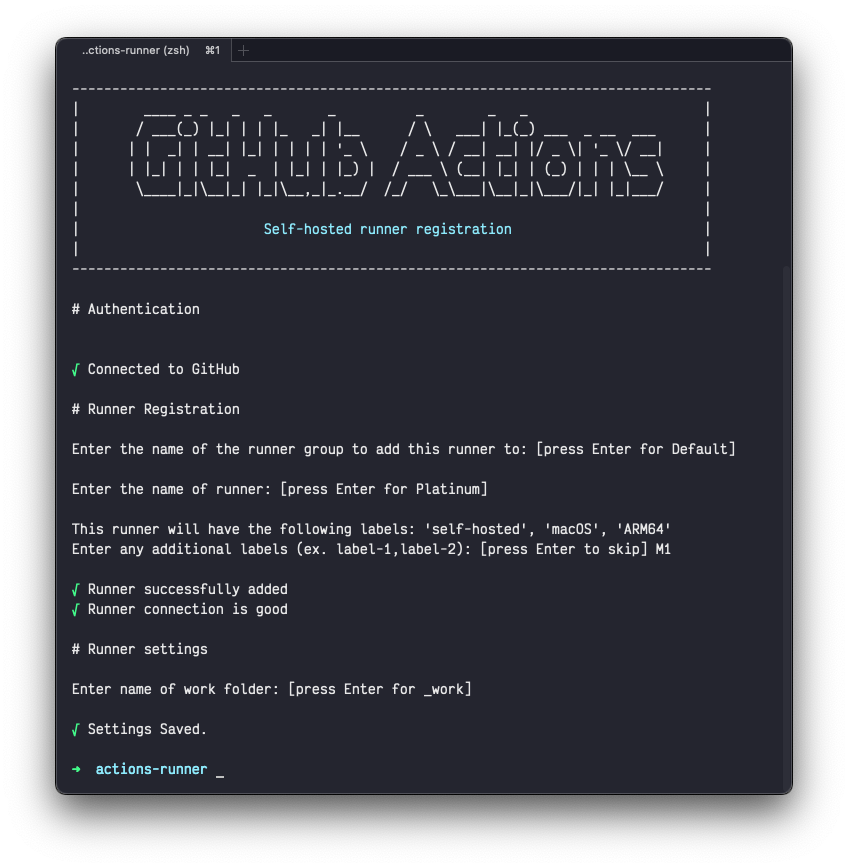
This will install the GitHub Actions Runner software on your machine. You will be prompted to enter your GitHub credentials. After entering your credentials, you will be asked to enter a name for the runner. You can enter any name you want. I will use mac-mini as the name for this guide.
Running the configuration command(./config.sh) will ask you for a few details about the runner. You can leave the defaults as is (except for labels, I added an M1 tag just to be fancy) like I did for this guide.
Running the Actions Runner as a service
Now that we have the runner installed, we will want to run it as a service so that it will automatically start when the machine boots up.
This should be done using the svc.sh script included in the GitHub Actions Runner software we installed earlier.
…But as of writing this guide, the svc.sh script is broken. It will fail to start the runner as a service. So we will have to do it manually.
So we will find wisdom from the issues thread and try to run the service as a LaunchDaemon.
The process is not too complicated, we will just need to place a plist in the correct directory as a workaround.
Running ./svc.sh install will create a plist file in /Library/LaunchAgents/ directory. We will need to move this file to the ~/Library/LaunchDaemons/ directory.
➜  actions-runner ./svc.sh install
Creating launch runner in /Users/runner/Library/LaunchAgents/***
Creating /Users/runner/Library/Logs/***
Creating /Users/runner/Library/LaunchAgents/***
Creating runsvc.sh
Creating .service
svc install complete
I have replaced the actual paths with *** for privacy, but you should be able to find the correct paths in the output.
The plist file should look something like this:
<?xml version="1.0" encoding="UTF-8"?>
<!DOCTYPE plist PUBLIC "-//Apple//DTD PLIST 1.0//EN" "http://www.apple.com/DTDs/PropertyList-1.0.dtd">
<plist version="1.0">
  <dict>
    <key>Label</key>
    <string>***</string>
    <key>ProgramArguments</key>
    <array>
      <string>/Users/runner/actions-runner/runsvc.sh</string>
    </array>
    <key>UserName</key>
    <string>runner</string>
    <key>WorkingDirectory</key>
    <string>/Users/runner/actions-runner</string>
    <key>RunAtLoad</key>
    <true/>
    <key>StandardOutPath</key>
    <string>/Users/runner/Library/Logs/***/stdout.log</string>
    <key>StandardErrorPath</key>
    <string>/Users/runner/Library/Logs/***/stderr.log</string>
    <key>EnvironmentVariables</key>
    <dict>
      <key>ACTIONS_RUNNER_SVC</key>
      <string>1</string>
    </dict>
    <key>ProcessType</key>
    <string>Interactive</string>
    <key>SessionCreate</key>
    <true/>
  </dict>
</plist>
We will make a minor change and move this file to the ~/Library/LaunchDaemons/ directory.
# Move the plist file to the correct directory
sudo mv /Users/runner/Library/LaunchAgents/[YOUR_PLIST_FILENAME].plist /Library/LaunchDaemons/
Then, we will use launchctl to actually load the service and start it.
# Fix the permissions
sudo chown root /Library/LaunchDaemons/[YOUR_PLIST_FILENAME].plist
# Load the service
sudo /bin/launchctl load /Library/LaunchDaemons/[YOUR_PLIST_FILENAME].plist
If everything went well, you should be able to see the runner in the Actions settings page.

🎉 Congrats! Now you have a self-hosted runner that will automatically start when the machine boots up.
Grab Credentials from Apple
Now that we have the runner installed, we will need to grab some credentials from Apple. This is required to sign the app, which is also a requirement for uploading your App to TestFlight. This is a bit of a hassle, but it’s a one-time process.
Many of these steps might be familiar to you if you have already uploaded an app to the App Store before. This means that there is a very high chance that you have probably already done some of these work before. If you think that you are doing duplicate work, you can skip to the next section.
Here’s a list to keep you on track:
Certificates & Provisioning Profiles
- App ID
- Exported Distribution Certificate (.p12)
- Provisioning Profile (.mobileprovision)
For uploading to TestFlight, you will also need to grab some extra keys & information from App Store Connect. App Store Keys
- App Store API Key
- App Store API Private Key (.p8)
- App Store Issuer ID
Exporting Distribution Certificate
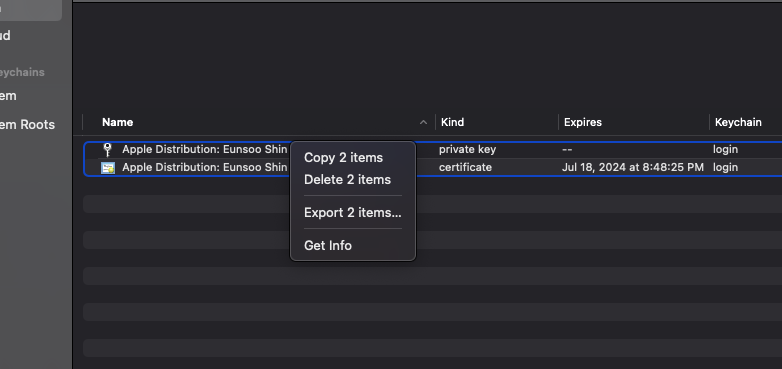
You will need a distribution certificate to sign the app. You can either create a new certificate or use an existing one. You can find your certificates in the Keychain Access app. Search for “distribution” and you should be able to find your certificate.
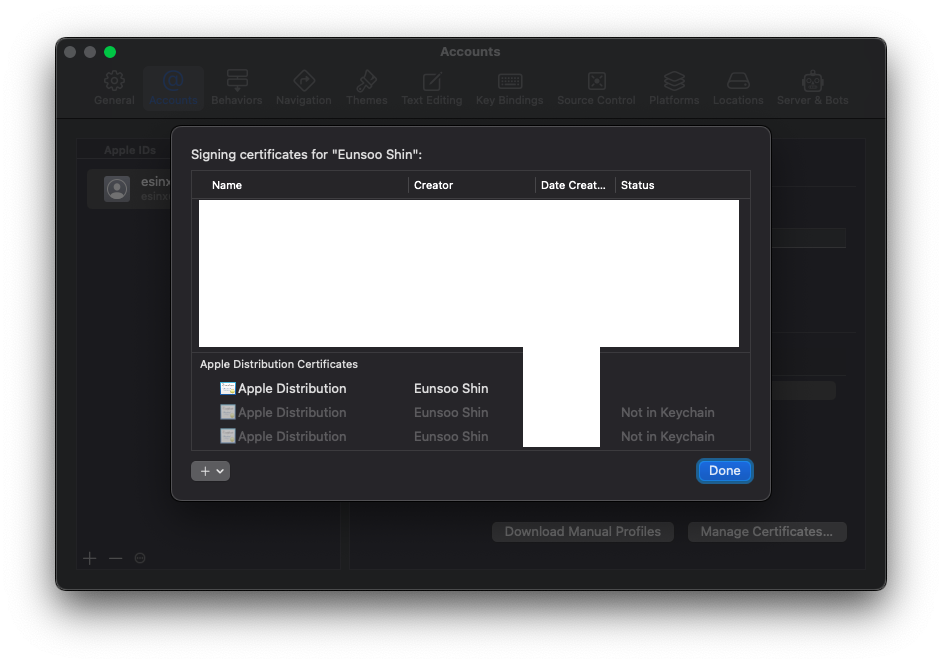
If not, you can create a new certificate by opening Xcode and going to Preferences > Accounts > Manage Certificates.
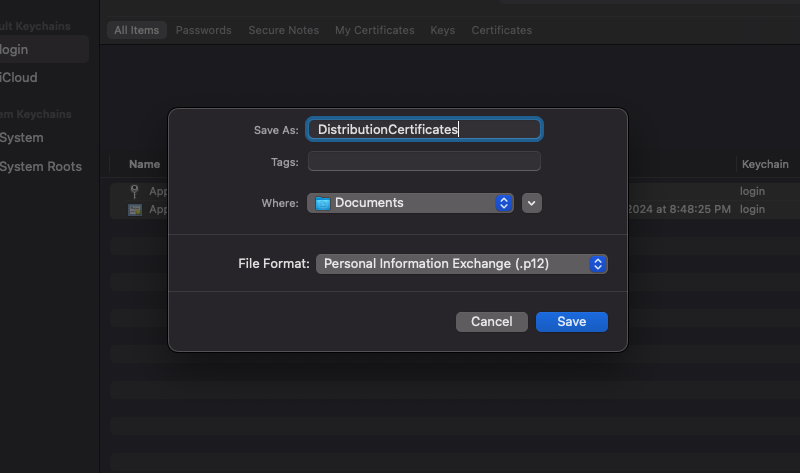
Once you have found your certificate, you will need to export it as a .p12 file. You can do this by right-clicking on the certificate and selecting “Export”.
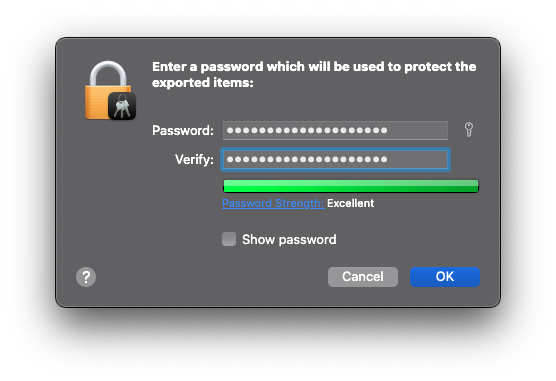
Upon exporting the certificate, you will be asked to enter a password. This password will be used to decrypt the certificate later on. Make sure to keep this password somewhere safe.
Create a new App ID
Head over to https://developer.apple.com/account/resources/identifiers/list and click on the ”+” button to create a new App ID.
Create a Provisioning Profile
Head over to https://developer.apple.com/account/resources/profiles/list and click on the ”+” button to create a new Provisioning Profile.
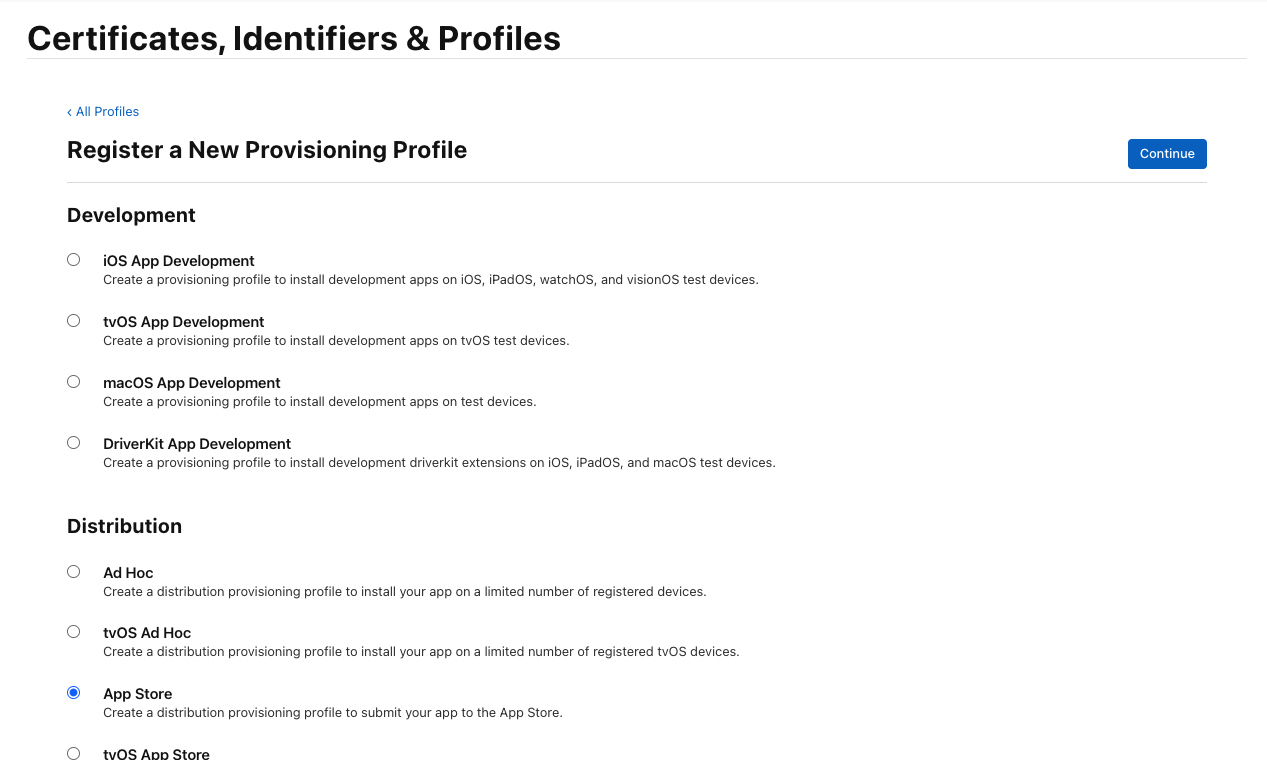
Select “App Store” under “Distribution” as the type of provisioning profile and click on “Continue”.
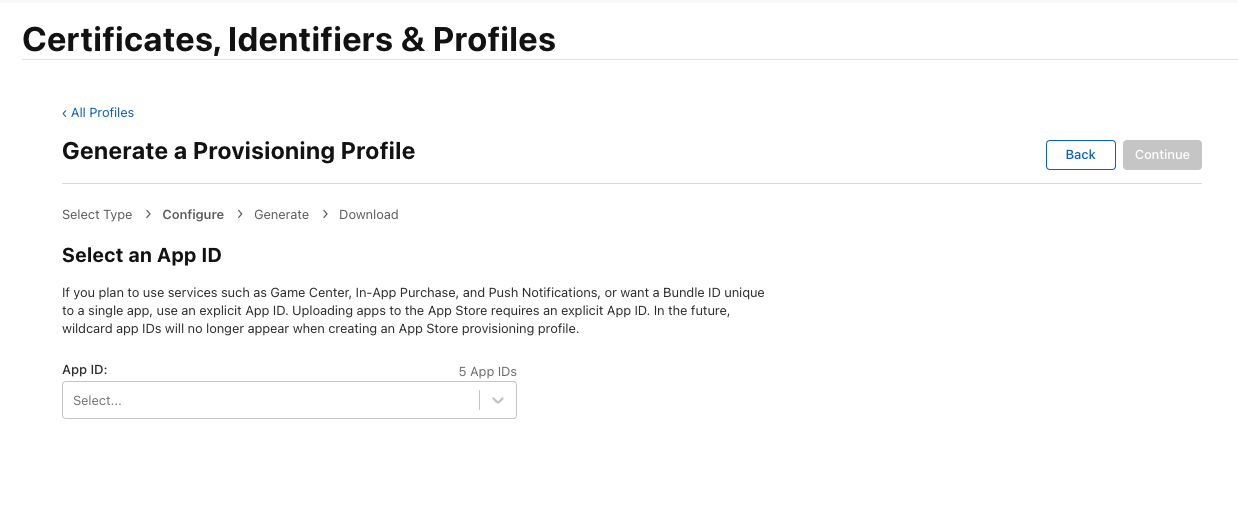
Then select the App ID that you created in the previous step and click on “Continue”.
You will be asked to select a certificate to sign the app. If you are not sure which certificate to use, you can select the one you created/exported in the previous step. Compare the expiration dates to make sure that you are using the correct certificate.
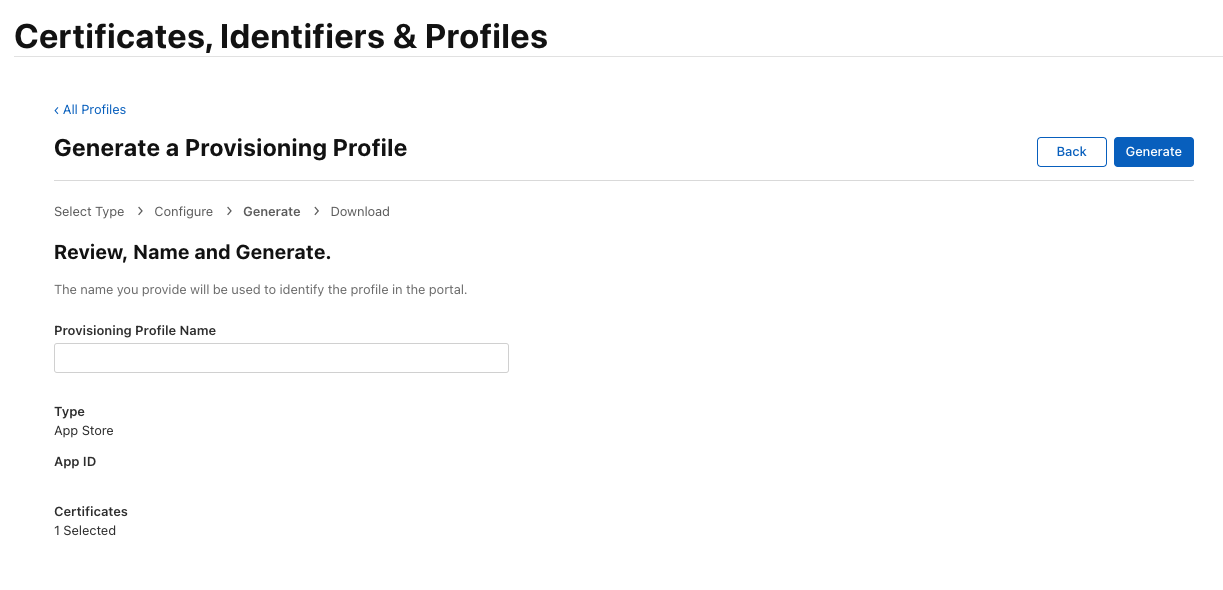
Finally, enter a name for the provisioning profile and click on “Generate”.
This will give you a .mobileprovision file. Keep this file somewhere safe.
App Store Connect API
Head over to https://appstoreconnect.apple.com/access/api and click on the ”+” button next to “Active”.
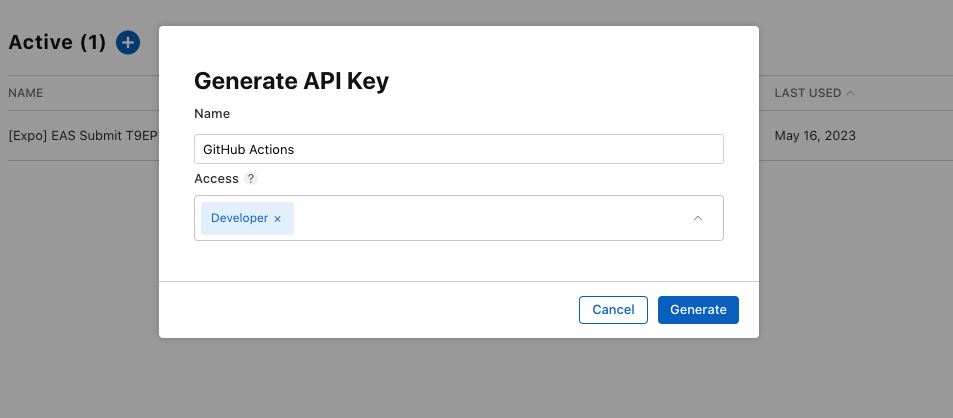
Once you have created the API key, you will be presented with the key ID and a .p8 file. Keep this file somewhere safe.
You will also find the Issuer ID on this page. Keep this somewhere safe as well.
Get Export Options
You will need to create an export options plist file. This file will be used to export the app as an IPA file. This can be generated on your local machine using Xcode.
First, head over to your project’s settings page and select the “Signing & Capabilities” tab. Check off “Automatically manage signing” and select “Provisioning Profile”.
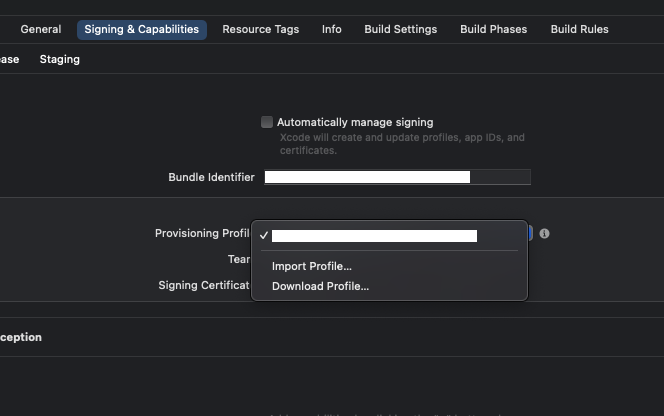
You will import the .mobileprovision file that you created earlier in this guide.
Now we will archive the app. Select “Any iOS Device” as the build target and click on “Product” > “Archive”.
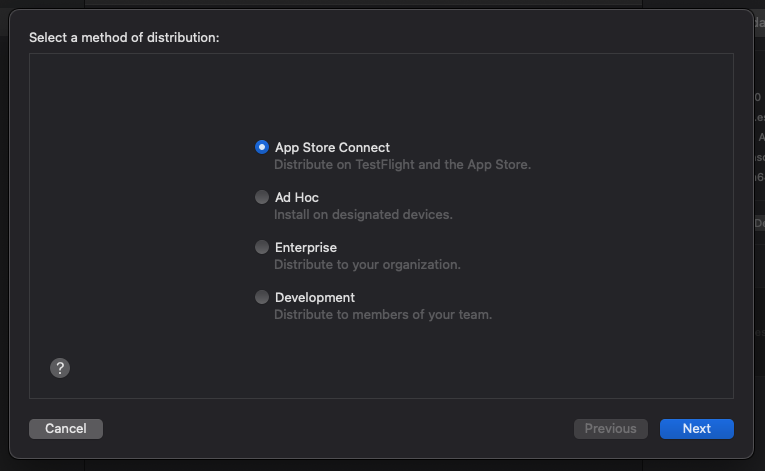
After the archive is created, you will be presented with a list of options. Select “Distribute App” and click on “Next”.
Select “App Store Connect” as the distribution method and click on “Next”.
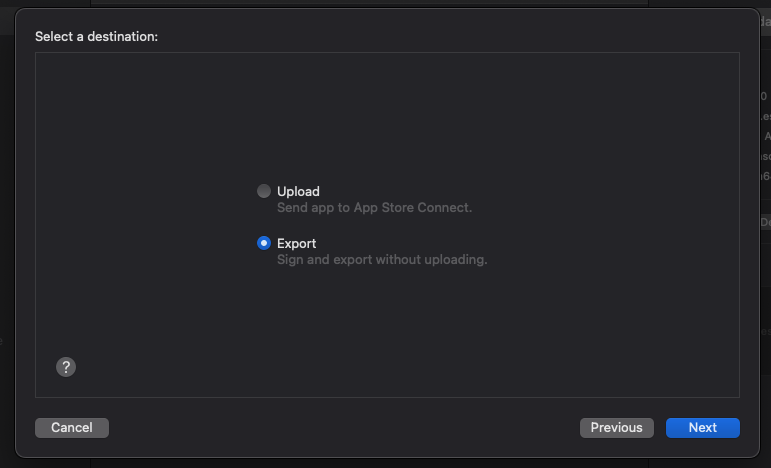
You will have the option to either upload the app to App Store Connect or export it as an IPA file. Select “Export” and click on “Next”.
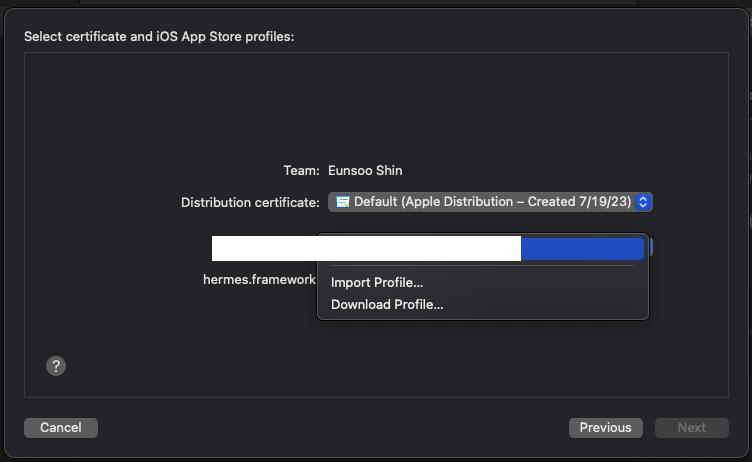
When prompted to select a certificate & provisioning profile, select the ones you created earlier in this guide.
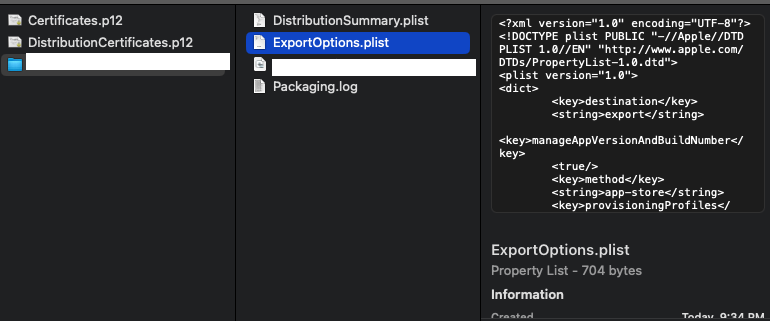
When Xcode is done exporting, navigate to the exported folder and grab the ExportOptions.plist file. This is the file that we will use in our GitHub Actions workflow.
🎉 Congrats! Now you have everything you need to configure CI/CD to upload your App to TestFlight!
Configuring GitHub Actions
Now that we have everything we need, we can finally configure GitHub Actions to upload our app to TestFlight. Before we start writing the workflow, we will need to add some secrets to our repository.
Adding Secrets
Here’s a list of secrets that we will need to add:
-
APPSTORE_API_KEY_ID: The key ID for the App Store Connect API Key -
APPSTORE_API_PRIVATE_KEY: The contents of the.p8file for the App Store Connect API Key -
APPSTORE_ISSUER_ID: The issuer ID from App Store Connect -
DISTRIBUTION_CERTIFICATE: The contents of the.p12file for the distribution certificate -
DISTRIBUTION_CERTIFICATE_PASSWORD: The password you used for the distribution certificate -
PROVISIONING_PROFILE: The contents of the.mobileprovisionfile for the provisioning profile -
EXPORT_OPTIONS_PLIST: The contents of theExportOptions.plistfile that you created earlier -
KEYCHAIN_PASSWORD: An arbitrary password that will be used to create a temporary keychain
Some of these are simple strings, some of these are files. We will need to convert the files into strings before adding them as secrets.
To do so, we will use base64 encoding. You can use the base64 command to encode the files.
Let’s encode the files one by one.
For convenience, I moves all my credentials into a single directory
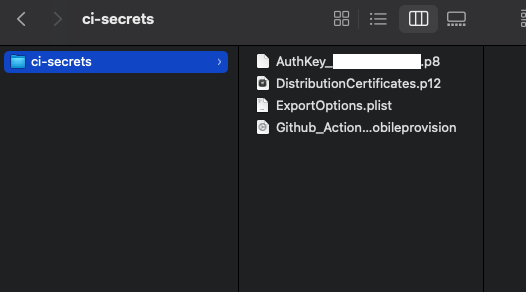
and ran the following commands:
➜ base64 -i ./AuthKey_XXXXXXXXXX.p8 > ./APPSTORE_API_PRIVATE_KEY.txt
➜ base64 -i ./DistributionCertificates.p12 > ./DISTRIBUTION_CERTIFICATE.txt
➜ base64 -i ./ExportOptions.plist > ./EXPORT_OPTIONS_PLIST.txt
➜ base64 -i ./Github_Actions.mobileprovision > ./PROVISIONING_PROFILE.txt
Now that we have all the files encoded, we can add them as secrets.
Head over to your repository’s settings page and click on “Secrets” on the left sidebar. Then click on “New repository secret”.
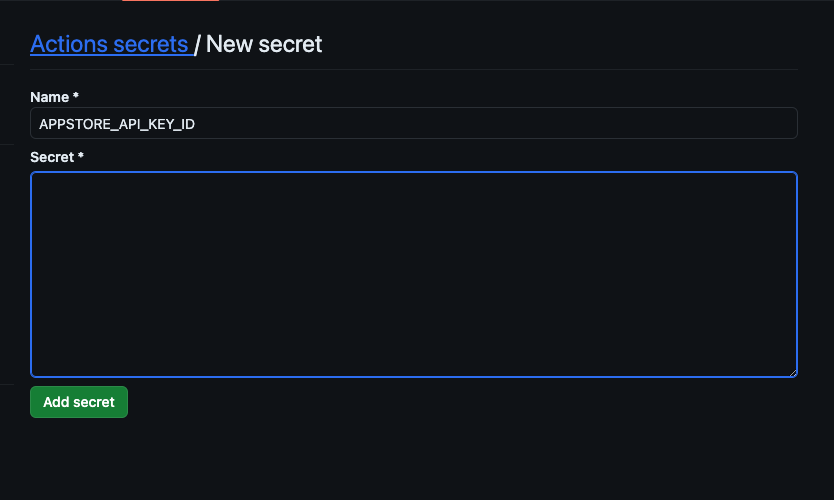
Add the secrets listed above one by one. Make sure to use the correct names.
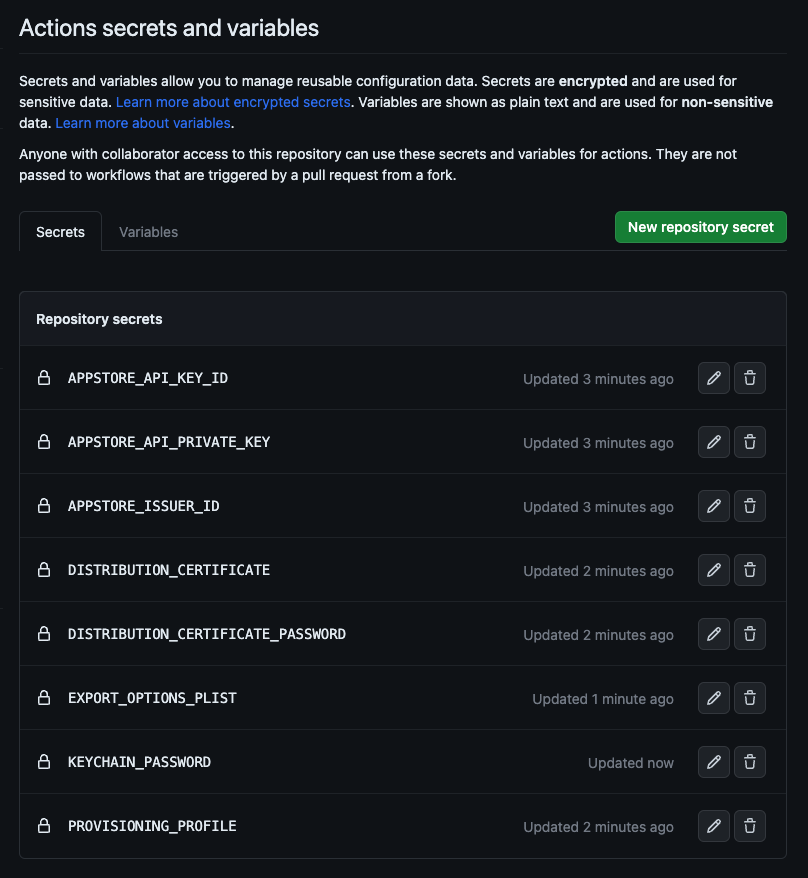
The KEYCHAIN_PASSWORD secret is a bit different. This is an arbitrary password that will be used to create a temporary keychain. You do not have to remember nor do you have to keep this password in any case. You can use any password you want, preferably something that is strong (as always). For my case, I used the uuidgen command to generate this password.
If you have all the secrets added, your secrets page should look something like this:
Writing the Workflow
Now that we have all the secrets added, we can finally write the workflow.
First off, we will have to create a new workflow file. Create a new file in the .github/workflows/ directory and name it TestFlight.yml.
We will also have to decide when we want to run the workflow. For this guide, I will run the workflow on every release tag. You can change this to whatever you want.
on:
  release:
    types: [created]
Next, we will have to specify the runner that we want to use. Since we are using a self-hosted runner, we will have to specify the label of the runner that we created earlier.
In this case, I specified my runner’s label with self-hosted and macOS
jobs:
  TestFlight_ios:
    runs-on: [self-hosted, macOS]
Now, the most important part of the workflow: the steps.
We will import the secrets as an environment variable and decode the file values using the base64 command. This step will create a temporary keychain and import the certificate while placing the provisioning profile in its appropriate place.
jobs:
  TestFlight_ios:
    runs-on: [self-hosted, macOS]
    steps:
      - name: Checkout repository
        uses: actions/checkout@v3
      - name: Prepare Apple Certificate and Provisioning Profile
        env:
          DISTRIBUTION_CERTIFICATE: ${{ secrets.DISTRIBUTION_CERTIFICATE }}
          DISTRIBUTION_CERTIFICATE_PASSWORD: ${{ secrets.DISTRIBUTION_CERTIFICATE_PASSWORD }}
          PROVISIONING_PROFILE: ${{ secrets.PROVISIONING_PROFILE }}
          KEYCHAIN_PASSWORD: ${{ secrets.KEYCHAIN_PASSWORD }}
        run: |
          # create variables
          CERTIFICATE_PATH=$RUNNER_TEMP/DistributionCertificate.p12
          PP_PATH=$RUNNER_TEMP/Distribution.mobileprovision
          KEYCHAIN_PATH=$RUNNER_TEMP/app-signing.keychain-db

          # import certificate and provisioning profile from secrets
          echo -n "$DISTRIBUTION_CERTIFICATE" | base64 --decode -o $CERTIFICATE_PATH
          echo -n "$PROVISIONING_PROFILE" | base64 --decode -o $PP_PATH

          # create temporary keychain
          security create-keychain -p "$KEYCHAIN_PASSWORD" $KEYCHAIN_PATH
          security list-keychains -s $KEYCHAIN_PATH login.keychain-db
          security default-keychain -s $KEYCHAIN_PATH
          security unlock-keychain -p "$KEYCHAIN_PASSWORD" $KEYCHAIN_PATH

          security list-keychains

          # import certificate to keychain
          security import $CERTIFICATE_PATH -P "$DISTRIBUTION_CERTIFICATE_PASSWORD" -A -t cert -f pkcs12 -k $KEYCHAIN_PATH
          security set-key-partition-list -S apple-tool:,apple: -s -k "" $KEYCHAIN_PATH
          # security list-keychain -d user -s $KEYCHAIN_PATH login.keychain-db

          UUID=`/usr/libexec/PlistBuddy -c 'Print :UUID' /dev/stdin <<< $(security cms -D -i $PP_PATH)`
          mkdir -p "$HOME/Library/MobileDevice/Provisioning Profiles/"
          cp $PP_PATH "$HOME/Library/MobileDevice/Provisioning Profiles/$UUID.mobileprovision"
For extra credit, add a CocoaPods cache step to speed up the build process.
      - name: Setup CocoaPods Cache
        uses: MasterworksIO/action-local-cache@1.0.0
        with:
          path: ./Pods
          key: ${{ runner.os }}-pods-${{ hashFiles('**/Podfile.lock') }}
Now we will add the build step. This step will specify which workspace file, scheme and configuration to use to build the project as well setting the provisioning profile to the one we created in the previous step. As it’s required to access the certificate in the keychain we created, this step will also unlock the keychain with the pre-set password.
      - name: Build for TestFlight
        env:
          KEYCHAIN_PASSWORD: ${{ secrets.KEYCHAIN_PASSWORD }}
        run: |
            PP_PATH=$RUNNER_TEMP/Distribution.mobileprovision
            UUID=`/usr/libexec/PlistBuddy -c 'Print :UUID' /dev/stdin <<< $(security cms -D -i $PP_PATH)`
            KEYCHAIN_PATH=$RUNNER_TEMP/app-signing.keychain-db
            security unlock-keychain -p "$KEYCHAIN_PASSWORD" $KEYCHAIN_PATH
            xcodebuild clean archive -workspace ./[PROJECT_NAME].xcworkspace -archivePath $RUNNER_TEMP/[PROJECT_NAME].xcarchive -scheme [PROJECT_SCHEME] -configuration [PROJECT_CONFIG] PROVISIONING_PROFILE="$UUID"
Next, we export the build. Using the archive file we just created, we can generate the .ipa file required to upload to TestFlight. This step will also decode the export options plist file we added in the repo secrets.
      - name: Export app
        env:
            NATIVE_IOS_STAGING_EXPORT_OPTIONS: ${{ secrets.NATIVE_IOS_STAGING_EXPORT_OPTIONS }}
        run: |
          echo -n "$NATIVE_IOS_STAGING_EXPORT_OPTIONS" | base64 -d -o $RUNNER_TEMP/ExportOptions.plist
          mkdir -p $RUNNER_TEMP/export
          xcodebuild -exportArchive -archivePath $RUNNER_TEMP/[PROJECT_NAME].xcarchive -exportOptionsPlist $RUNNER_TEMP/ExportOptions.plist -exportPath $RUNNER_TEMP/export -allowProvisioningUpdates
Finally, we will upload the exported .ipa file to TestFlight.
      - name: Upload app to TestFlight
        env:
          APPSTORE_API_PRIVATE_KEY: ${{ secrets.APPSTORE_API_PRIVATE_KEY }}
          APPSTORE_ISSUER_ID: ${{ secrets.APPSTORE_ISSUER_ID }}
          APPSTORE_API_KEY_ID: ${{ secrets.APPSTORE_API_KEY_ID }}
        run: |
          mkdir -p $RUNNER_TEMP/private_keys
          echo -n "$APPSTORE_API_PRIVATE_KEY" | base64 --decode -o $RUNNER_TEMP/private_keys/AuthKey_$APPSTORE_API_KEY_ID.p8
          xcrun altool --upload-app -f $RUNNER_TEMP/export/moca.ipa --type ios --apiKey $APPSTORE_API_KEY_ID --apiIssuer $APPSTORE_ISSUER_ID --show-progress
The final workflow file should look something like this:
on:
release:
types: [created]
jobs:
TestFlight_ios:
runs-on: [self-hosted, macOS]
steps:
- name: Checkout repository
uses: actions/checkout@v3
- name: Prepare Apple Certificate and Provisioning Profile
env:
DISTRIBUTION_CERTIFICATE: ${{ secrets.DISTRIBUTION_CERTIFICATE }}
DISTRIBUTION_CERTIFICATE_PASSWORD: ${{ secrets.DISTRIBUTION_CERTIFICATE_PASSWORD }}
PROVISIONING_PROFILE: ${{ secrets.PROVISIONING_PROFILE }}
KEYCHAIN_PASSWORD: ${{ secrets.KEYCHAIN_PASSWORD }}
run: |
# create variables
CERTIFICATE_PATH=$RUNNER_TEMP/DistributionCertificate.p12
PP_PATH=$RUNNER_TEMP/Distribution.mobileprovision
KEYCHAIN_PATH=$RUNNER_TEMP/app-signing.keychain-db
# import certificate and provisioning profile from secrets
echo -n "$DISTRIBUTION_CERTIFICATE" | base64 --decode -o $CERTIFICATE_PATH
echo -n "$PROVISIONING_PROFILE" | base64 --decode -o $PP_PATH
# create temporary keychain
security create-keychain -p "$KEYCHAIN_PASSWORD" $KEYCHAIN_PATH
security list-keychains -s $KEYCHAIN_PATH login.keychain-db
security default-keychain -s $KEYCHAIN_PATH
security unlock-keychain -p "$KEYCHAIN_PASSWORD" $KEYCHAIN_PATH
security list-keychains
# import certificate to keychain
security import $CERTIFICATE_PATH -P "$DISTRIBUTION_CERTIFICATE_PASSWORD" -A -t cert -f pkcs12 -k $KEYCHAIN_PATH
security set-key-partition-list -S apple-tool:,apple: -s -k "" $KEYCHAIN_PATH
# security list-keychain -d user -s $KEYCHAIN_PATH login.keychain-db
UUID=`/usr/libexec/PlistBuddy -c 'Print :UUID' /dev/stdin <<< $(security cms -D -i $PP_PATH)`
mkdir -p "$HOME/Library/MobileDevice/Provisioning Profiles/"
cp $PP_PATH "$HOME/Library/MobileDevice/Provisioning Profiles/$UUID.mobileprovision"
- name: Setup CocoaPods Cache
uses: MasterworksIO/action-local-cache@1.0.0
with:
path: ./Pods
key: ${{ runner.os }}-pods-${{ hashFiles('**/Podfile.lock') }}
- name: Build for TestFlight
env:
KEYCHAIN_PASSWORD: ${{ secrets.KEYCHAIN_PASSWORD }}
run: |
PP_PATH=$RUNNER_TEMP/Distribution.mobileprovision
UUID=`/usr/libexec/PlistBuddy -c 'Print :UUID' /dev/stdin <<< $(security cms -D -i $PP_PATH)`
KEYCHAIN_PATH=$RUNNER_TEMP/app-signing.keychain-db
security unlock-keychain -p "$KEYCHAIN_PASSWORD" $KEYCHAIN_PATH
xcodebuild clean archive -workspace ./[PROJECT_NAME].xcworkspace -archivePath $RUNNER_TEMP/[PROJECT_NAME].xcarchive -scheme [PROJECT_SCHEME] -configuration [PROJECT_CONFIG] PROVISIONING_PROFILE="$UUID"
- name: Export app
env:
EXPORT_OPTIONS_PLIST: ${{ secrets.EXPORT_OPTIONS_PLIST }}
run: |
echo -n "$EXPORT_OPTIONS_PLIST" | base64 -d -o $RUNNER_TEMP/ExportOptions.plist
mkdir -p $RUNNER_TEMP/export
xcodebuild -exportArchive -archivePath $RUNNER_TEMP/[PROJECT_NAME].xcarchive -exportOptionsPlist $RUNNER_TEMP/ExportOptions.plist -exportPath $RUNNER_TEMP/export -allowProvisioningUpdates
- name: Upload app to TestFlight
env:
APPSTORE_API_PRIVATE_KEY: ${{ secrets.APPSTORE_API_PRIVATE_KEY }}
APPSTORE_ISSUER_ID: ${{ secrets.APPSTORE_ISSUER_ID }}
APPSTORE_API_KEY_ID: ${{ secrets.APPSTORE_API_KEY_ID }}
run: |
mkdir -p $RUNNER_TEMP/private_keys
echo -n "$APPSTORE_API_PRIVATE_KEY" | base64 --decode -o $RUNNER_TEMP/private_keys/AuthKey_$APPSTORE_API_KEY_ID.p8
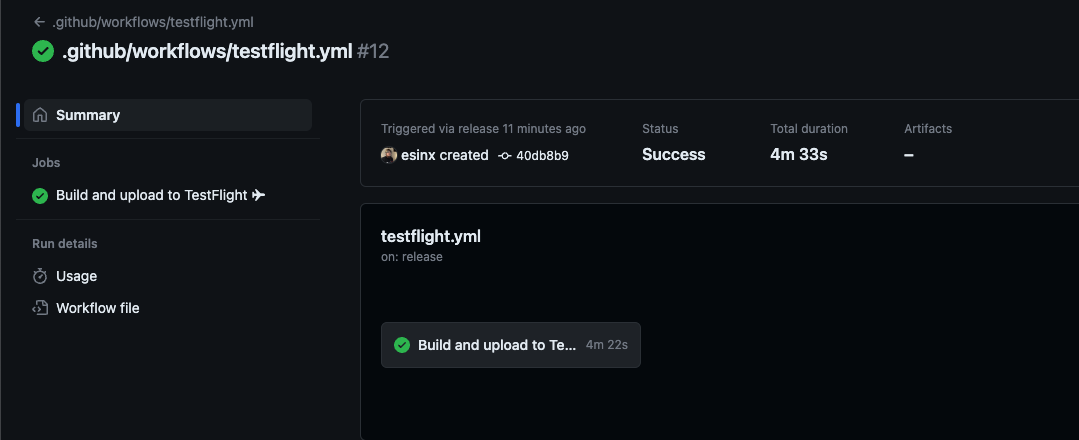
xcrun altool --upload-app -f $RUNNER_TEMP/export/moca.ipa --type ios --apiKey $APPSTORE_API_KEY_ID --apiIssuer $APPSTORE_ISSUER_ID --show-progress🎉 Finally we are done setting up CI/CD!

…and it works!
It took me a few tries to configure my Mac Mini runner to work with GitHub Actions. Some troubleshooting tips are:
- Check if you can build the project outside of the runner context. Try using Xcode to build on your self-hosted runner.
- See if your certificates are actually valid. In some cases, you may have to install intermediate certificates from Apple to complete the chain.
Conclusion
It’s no exaggeration to say that this was one of the most tedious CI/CD setups I’ve ever done. But hey! It works and this integration has been an important part of my (+team’s) workflow. I hope this guide was helpful to you. If you have any questions, feel free to reach out to me on Twitter.